There are more than 8,000 different surgical instruments, and the number is growing with increases in new surgical procedures, especially in the field of orthopedics. This is a daunting number of choices and, of course, not only is your selection going to be determined by the types of surgeries you do, but also by individual preferences.
The purpose of this article is to help you choose the right instruments for your needs, and how to properly use and care for them. It would be impossible to cover in this article anything more than some basics. For readers interested in learning more, I recommend the book, The World of Surgical Instruments for Animal Health by Rick Shultz.
Grade of surgical instruments
Historically, there have been two types of surgical instruments available: those made in Germany and those made in Pakistan. Other manufacturers have been entering the market, most notably China, but for the purpose of this article, I am only going to compare the first two. All instruments should be stamped with their country of origin.
Surgical grade, or German-made, instruments have a superior stainless steel compared to the economy grade, or Pakistani, instruments. What does this mean and what other differences are there? German-made instruments usually have a matte finish to reduce glare from surgical lights and often come with a warranty to cover defects. These instruments can also be repaired and sharpened, which is not an option with Pakistani instruments.
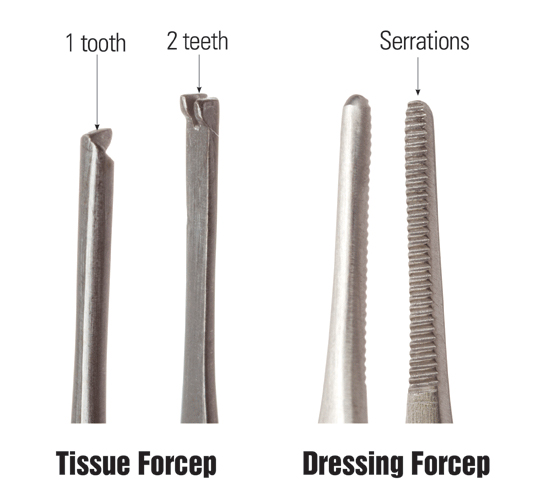
Photos courtesy The World Of Surgical Instruments For Animal Health
With proper care and maintenance, German-made instruments can last decades.
Surgical instrument care
Dried blood can interfere with cleaning and decontaminating surgical instruments, and it can allow a biofilm to form on the surface, which can also inhibit cleaning.
The Association for Surgical Technologists (AST) recommends keeping the instruments free of debris and blood during surgical procedures. This is best accomplished with a sterile water-moistened sponge or, in the case of instruments with lumens, using a sterile water-filled syringe.
For an optimal cleaning process:
1) Promptly transfer items to be cleaned to a decontamination area to manually remove any visible soils by brushing and rinsing.
2) Brushing and flushing cannulated instruments is especially important.
3) Use an ultrasonic cleaner to remove soils from hard-to-reach areas.
4) Do a final rinse with distilled or purified water.
5) Dry with a lint-free towel.
6) Use surgical lubricant as needed.
Sterilizing instruments
The Association for the Advancement of Medical Instrumentation (AAMI) has guidelines for properly sterilizing instruments (See “Sterilization in five steps”). Additionally, a few other things should be considered.
Pouch sterilization is convenient for single-instrument sterilization, with a few precautions to think about: Use tip protectors on instruments such as osteotomes to prevent puncture. Do not allow the pouches to touch the walls of the autoclave during sterilization , neither should they be allowed to lay flat as they can accumulate moisture within the pack. Instead, use a specially designed peel pouch pack. Allow the pouches to dry inside the autoclave prior to removal.
Do not write on the paper part of the pouch. Store sterilized pouches away from water and humidity. Inspect the pouch for tears prior to surgical use.
Tabletop sterilizers are the most common item used in private practice to sterilize instruments. These recommended steps are general considerations, but always default to the manufacturer’s instructions:
1) Never overload the autoclave.
2) Unplug during manual cleaning. Chamber cleaners are available from the manufacturer.
3) Check the owner manual to see if there are any filters that need maintenance.
4) Clean door gaskets with a damp towel to maintain gasket life and seal.
5) Clean according to manufacturer’s directions, about once monthly or every 20 to 30 cycles.
Identifying instruments
Colored tape is used to identify instruments, so they are bundled together in the proper packs. There are a few things to consider for the application of the tape: Always apply the tape on a flat area of the instrument; otherwise, it will not properly stick.
Choose an area close to the handle where it will not come in contact with tissue. Clean the area with alcohol before applying the tape. Only wrap the tape 1¼ times around the instrument, as such will allow for proper closure of the instrument.
Immediately autoclave the newly taped instruments as this will “set” the tape to ensure it remains in position (Figure 1).
Specific instruments
There are too many instruments to describe individually. I am only going to talk about the three instruments essential to every surgical pack: Mayo scissors, needle holders, and tissue forceps.
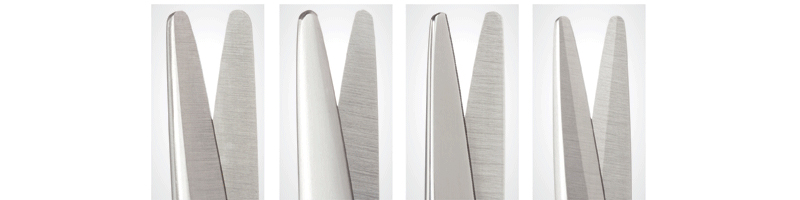
- Mayo scissors – All Mayo scissors are used for cutting non-delicate or tough tissue. They range in size from 5 ½” to 9” (shorter instruments tend to work better in our smaller patients) and are either curved or straight. They can also have variations with one or both tips sharp or rounded (Figure 2). Mayo scissors are available for left-handed users, as well.
- Needle holders – Needle holders have many variations. The two most common types used in general practice are Olsen-Hegar (with scissor portion) and Mayo-Hegar (Figure 3). Besides the tips, there are variations within the needle holders:
- Smooth jaw holders are designed to hold extremely fine suture material.
- Black handle holders have diamond dust jaws, for grasping very fine needles.
- Green handle holders have ceramic jaws.
- Blue handles holders are made of titanium, which is lightweight, non-magnetic, and stronger than steel.
- Tissue forceps – There are dozens of types of tissue forceps. The most common in use is the Adson Brown forceps (multiple teeth) and Adson tissue forceps (sometimes called an Adson rat tooth, it has 1 x 2 teeth). Thumb dressing forceps are commonly included in surgery packs for grasping surgical sponges during procedures (Figure 4). It is my experience that the proper selection of tissue forceps is often ignored. They can play an important role in how they grasp or manipulate tissue, especially delicate tissue.
I keep several different types available in sterilized pouches, available when I need them: Russian Forcep, Corn Suture Forcep, Iris Forcep, and Bishop-Harmon Forcep, to name a few. If you are doing a lot of surgery, especially delicate surgery, they are a worthwhile investment.
What to put in a surgical pack
Obviously, there are individual preferences. In my single-doctor practice, I have a one-size-fits-all set of packs. I keep special instruments such as the forceps mentioned above, eye surgery instruments and special scissors (Metzenbaum and iris scissors) in pouches at the ready when I need them.
For a larger practice, you may want to have separate OHE and general surgery packs, an eye pack, and an orthopedic pack if you perform those surgeries.
For the all-purpose pack, you may prefer one type of scissor or needle holder over another; this list is simply a guide:
- 1 Spay hook or Snook hook
- 1 Olsen-Hegar needle holder
- 1 Mayo scissors
- 1 Adson Brown forceps
- 1 Thumb dressing forceps
- 1 #3 Knife handle
- 4 Backhaus towel forceps
- 4 Mosquito hemostats, curved
- 2 Kelly Hemostats straight
- 2 Kelly Hemostats curved
- 4 Rochester Carmalts, curved
Conclusion
The right tool makes for a more pleasant experience. Keeping those tools sharp and in good working order also makes the job much less frustrating.
There is nothing worse than tissue forceps that want to scissor on you or needle holders that have lost their grip or develop a sharp edge that cuts the suture as you try to tie it. Often, this is because an instrument is used inappropriately; using a needle holder to pull IM pins or a scissor to cut a wire suture.
Make sure you spend the money up front on quality instruments from a supplier that will give you a warranty and support when it comes to repairs and maintenance.
|
STERILIZATION IN FIVE STEPS |
| The AAMI recommends this process for sterilizing all instruments:
1) Disassemble all instruments or devices comprising of more than one part according to manufacturer’s written instruction and open all jointed instruments. 2) Open all hinged surgical instruments with handles, such as scissors, needle holders, and hemostats. 3) Ratcheted instruments should be unlatched. Racks, pins, stringers, or other specifically designed devices can be used to hold the instruments in the unlatched position. 4) Put all heavier instruments in the bottom of the pack or tray, and lighter more delicate instruments on the top to avoid damage. 5) Consider specialty trays for delicate micro instruments. |
Michael Petty, DVM, is a graduate of the veterinary school at Michigan State University. As the owner of Arbor Pointe Veterinary Hospital and the Animal Pain Center in Canton, Michigan, Dr. Petty has devoted his professional life to the care and well-being of animals, especially in the area of pain management. Petty is the past president of the International Veterinary Academy of Pain Management. A frequent speaker and consultant, he has published articles in veterinary journals and serves in an advisory capacity to several pharmaceutical companies on topics of pain management. Petty has been the investigator/veterinarian in 12 FDA pilot and pivotal studies for pain management products. He has lectured both nationally and internationally on pain management topics.