This month’s column will discuss the double flap approach for treatment of pre-existing oronasal fistulas that occur in the area of the maxillary canine tooth in dogs. This technique may only be used to treat pre-existing oronasal fistulas, but not for treatment of fistulas discovered at the time of extraction of the maxillary canine tooth.
There are two important concepts I would like to emphasize prior to any oronasal fistula repair. First, it is important to understand what a fistula is; it is an abnormal connection between two hollow spaces. In the context of oronasal fistulas, this is an epithelized communication that connects the oral cavity and the nasal cavity.
If no attempt is made to de-epithelialize the recipient bed, the mucoperiosteal flap will absolutely not heal, even if the perfect flap is raised. Freshening the recipient bed by removing tissue with either a scalpel blade or a diamond bur is essential for a successful outcome.
The second important concept is this: large flaps are necessary for successful repair of small defects and very large flaps are necessary for successful repair of large defects. It is essential these flaps are tension-free. Therefore, the periosteum must be released from the underlying mucosa (Figure 3) and broad-based mucosal releasing incisions are extended as needed to ensure a tension-free closure. To release the periosteum, I use a pair of tenotomy, iris, or LaGrange scissors.
Double flaps can be helpful in some cases, allowing the body’s natural tissue to essentially serve as a “membrane” to support the second, more superficial flap. I find I rarely need to consider anything more than a single flap technique for defects associated with a diseased or missing maxillary canine tooth, but if you experience an unexpected dehiscence of a single flap repair, a double flap technique may be worth considering once the tissue has ample time to heal
and re-epithelialize.
The traditional double flap technique involves not only a mucoperiosteal flap raised on the buccal aspect of the defect, but also an initial flap of palatal mucosa and submucosa raised with a hinged attachment immediately palatal to the defect. The flap raised from the palatal aspect of the defect is the first flap to be raised and is sutured to the freshened edge of the buccal surface of the defect created by raising the buccal flap. The buccal flap is then raised with enough tension-free tissue to allow for the buccal flap to cover not only the defect, but also, ideally, the donor site of the first flap.
There are variations of the double flap technique. One that my colleagues (Slava Eroshin, DVM, DAVDC, and Kelly Saverino, DVM, DAVDC) made me aware of includes a technique for fully epithelialized chronic oronasal defects, where the first flap is created by a circumferential incision peripheral to the defect, allowing for all the mucosa/gingiva immediately adjacent to the defect to be raised and folded into the defect and sutured together in the middle of the defect.
The benefits of this technique are: 1) You are assured to have created a de-epithelialized edge around the entire circumference of the defect, 2) There is not as large of a palatal donor site to cover with the second flap. A theoretical downside to this approach is the sutures of the first flap are sitting directly within the defect with no bony support underneath.
We recently had the opportunity to perform a modified version of this technique that takes advantage of a hinged first flap but does not create a large palatal donor site, so the second flap does not need to travel as far toward the midline.
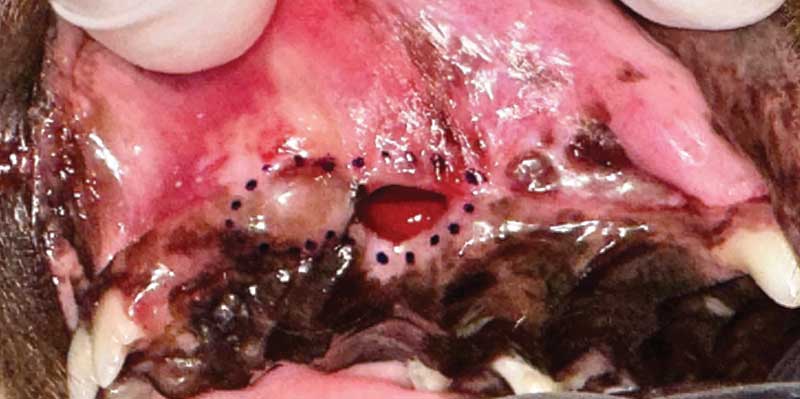
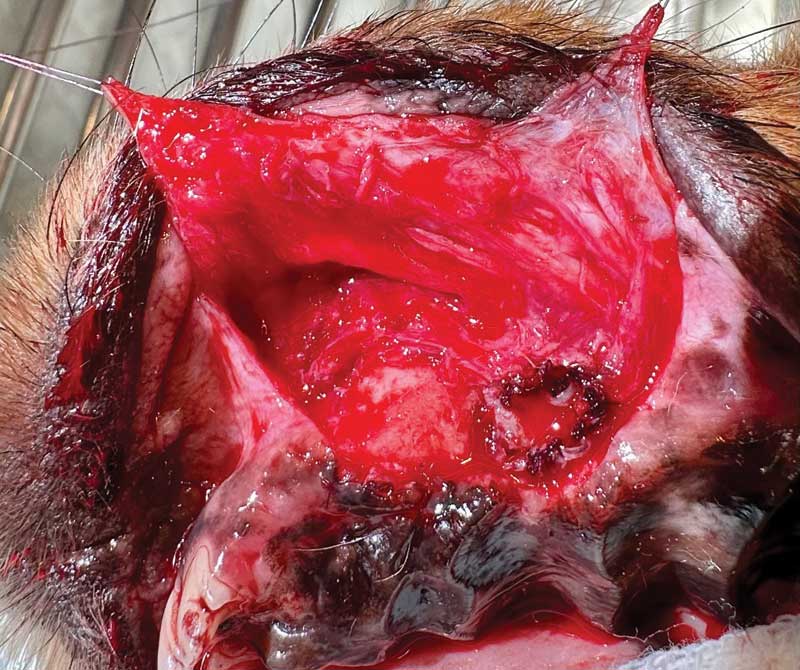
Figure 1 shows the dotted lines for the initial incisions. One incision is made circumferentially around almost the entire defect, except for the rostral most aspect of the defect, so a hinged flap can be raised from this area.
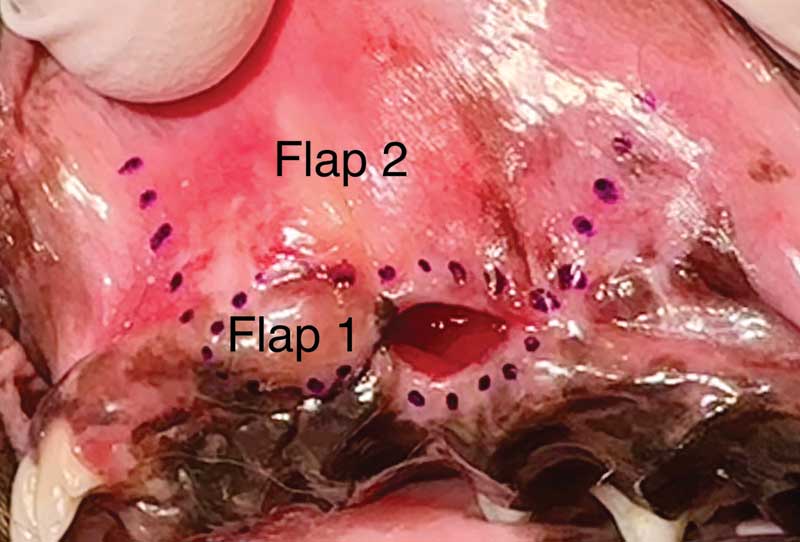
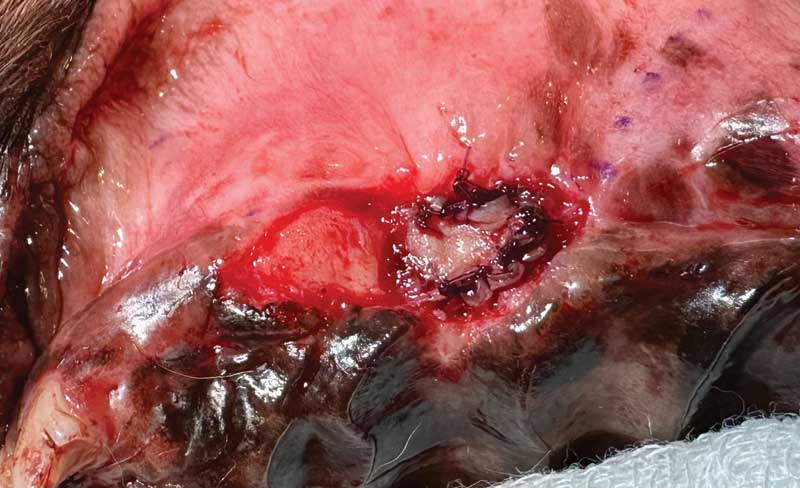
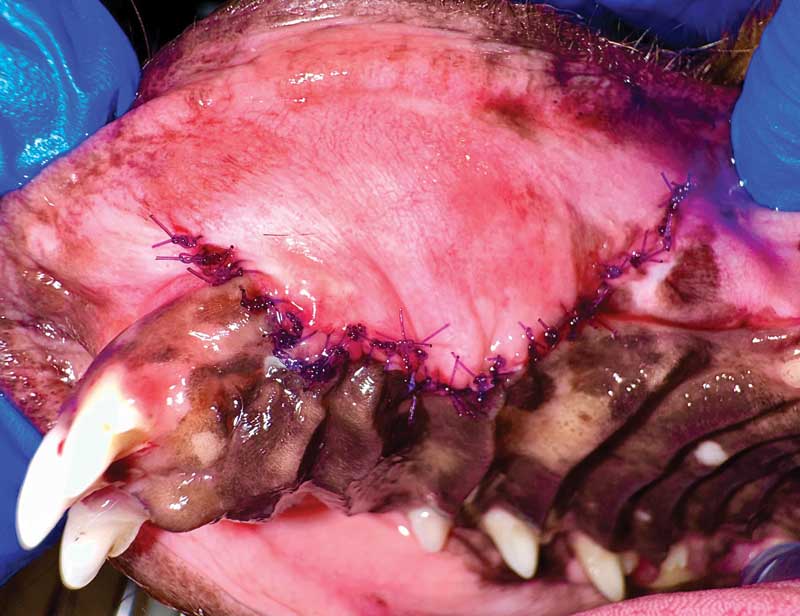
Figure 2 shows where the tissue is obtained for the first and second flaps. The sutures of the first flap are located at the periphery of the defect rather than directly over the void (Figure 3). The second flap is raised with broad-based releasing incisions, and the periosteum is released beneath it to minimize tension (Figure 4). The second flap fully covers the area of the first flap and is attached with closely spaced simple interrupted 5-0 absorbable sutures at the cut edge on the palatal side of the oronasal defect (Figure 5).
Prior to closure, try this test to determine if the flap is tension-free: Lay the flap over the defect and see if it recoils to its original position or if it stays where placed, even without any suture. This will tell you if tension will play a role with possible dehiscence. If the flap recoils, more release of the periosteum is necessary or releasing incisions should be lengthened. Postoperatively, alert pet owners to not put tension on the sutured flap by avoiding lifting the upper lip on the side of the oronasal fistula.
Hopefully these tips will help with those challenging oronasal fistula repairs! The fewer the attempts, the less scar tissue will be laid down in the area, so these are cases you may want to refer to your local specialist.
John R. Lewis, VMD, DAVDC, Fellow, AVDC OMFS, practices at Veterinary Dentistry Specialists and teaches at Silo Academy Education Center, both in Chadds Ford, Pa.