When requiring extraction, the firmly rooted maxillary fourth premolar poses a challenge in both cats and dogs because it is prone to fracture. This tooth (Triadan number 108, 208) is referred to as the maxillary carnassial tooth. It meets with the mandibular carnassial tooth (tooth 309, 409) and is quite literally responsible for “cutting of flesh.”
The most common type of maxillary carnassial fracture, or slab fracture, involves its largest cusp and often causes loss of much of the enamel and dentin from the buccal surface of the tooth. If the fracture is confined to the crown without pulp exposure, it is referred as an uncomplicated crown fracture. Unfortunately, complicated fractures (with pulp exposure) are common.
A fracture that involves the crown and extends beneath the gingival margin is referred to as a crown-root fracture. A tooth with a complicated fracture requires either extraction or endodontic therapy. All tooth fractures warrant assessment and radiography, but if further assessment of an uncomplicated fracture is within normal limits, treatment may not be necessary.
For treatment of carnassial teeth with complicated crown fractures, endodontic therapy is an elegant way to deal with pulp exposure. Mature teeth may be good candidates for root canal therapy if the canals can be instrumented, and the fracture does not extend too far beneath the gingival margin. However, sometimes, a firmly rooted tooth needs to be extracted.
In large-breed dogs, the surface area of the large roots and the tooth’s retention features require constant and steady forces to deliver the tooth. In cats, the sectioned crown-root segments can be brittle and break easily.
Follow these step-by-step instructions to help minimize complications when extracting firmly rooted maxillary fourth premolars.
1) Make mesial and distal releasing incisions and connect the two with a sulcular incision. Use a number 15 or 15c scalpel blade to make the incisions and to free up the attached gingiva.
There are a few anatomic structures to be aware of prior to making the releasing incisions. The apical-most portion of the mesial releasing incision should avoid the neurovascular bundle that exits the infraorbital foramen dorsal to the distal root of the maxillary third premolar.
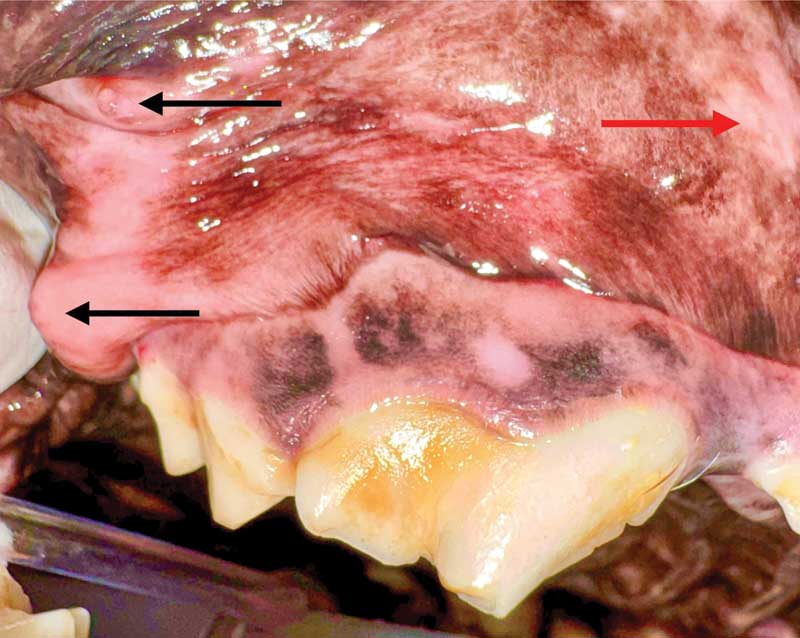
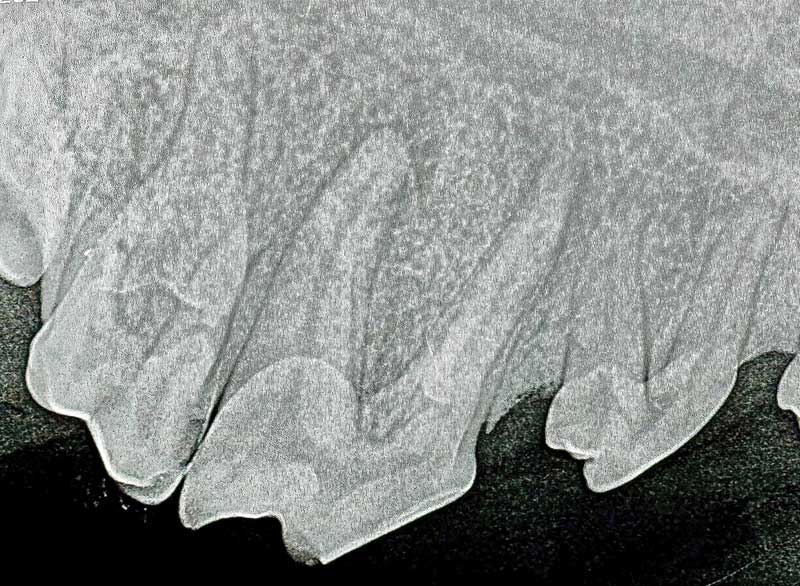
The distal releasing incision is optional depending on how much exposure is needed to remove the distal root. If a distal releasing incision is made, it extends dorsal to the mucogingival line, but care should be taken to avoid the papilla of the parotid and zygomatic salivary glands (Figure 1). Obtain a diagnostic dental radiograph prior to extracting the tooth (Figure 2).
2) Use a periosteal elevator to raise the mucoperiosteal flap. Periosteal elevators should be sharpened regularly so the edge of the instrument can find a space between the bone and the attached gingiva. Once placed beneath the gingiva, use a lifting motion to lever the attached gingiva off the bone. Proceed with caution near the mucogingival line to avoid accidental perforation of the flap. If a small perforation occurs, placement of a suture or two should be sufficient. If a large perforation occurs and there is concern of adequate blood supply to the flap distal to the perforation, gingiva can be removed to make the perforated mucosa the new edge of the flap. A stay suture can be placed to retract the flap while using a high-speed handpiece.
3) Use a #2 surgical round bur to create windows in the bone directly lateral to the mesiobuccal and distal roots. The maxillary carnassial tooth has three roots: mesiobuccal, distal and mesiopalatal (aka palatal) roots. Remove bone over approximately 60 percent of the length of the root, starting at the alveolar margin.
The bone is thin over these roots, so avoid removing too much hard tissue and weakening the roots prior to elevation/luxation. Remove a small amount of bone from the furcation, but limit interradicular bone removal dorsal to the furcation, since this furcational bone will be leveraged when using a dental elevator.
4) A crosscut fissure bur (surgical length 702 bur in dogs or 701 bur in cats) is used to section the tooth into three crown-root segments, starting in the furcation and extending through the full height and thickness of the crown. The height of the crown may be lowered with this same bur to allow for easier placement of dental elevators in the space between the crown-root segments.
Separate the distal crown-root segment from the mesiobuccal crown-root segment, then separate the palatal crown-root segment from the mesiobuccal crown-root segment. For this latter separation, a 702 bur may be too bulky to easily find the furcation between the palatal and the mesiobuccal roots. Consider its smaller cousin, the 701 bur, to find a path through the furcation.
5) Once the tooth is sectioned into three pieces, test to determine if the crown-root segments are truly separated. Place a #2 winged dental elevator in the space created between the two crown-root segments. Twist the elevator and see if the crown-root segments move independently to ensure the segments are fully separated. Begin to break down the periodontal ligament of the distal surface of the mesial root and the mesial surface of the distal root by placing the elevator in the space, twisting and holding for 10 seconds. Use a combination of elevators and luxators to break down all the attachments of the tooth. Dental elevators are used as a lever or a wedge to leverage the tooth root against adjacent alveolar bone. Dental luxators are comparable to miniature scalpel blades to cut the periodontal ligament. Both elevators and luxators are helpful to remove roots without breaking them.
6) To create space for a dental elevator between the tooth of interest and the adjacent tooth, a 701 bur may be used to carefully remove the coronal bulge from the distal aspect of the crown. The operator should be careful to not damage the adjacent tooth that is not being extracted.
7) Continue elevation and luxation until the crown-root segments become “piano key” loose. Grab the crown-root segment with extraction forceps or rongeurs and gently twist in the clockwise direction until slight resistance is felt. Hold this position for at least 10 seconds. Twist the forceps in the opposite direction until slight resistance is felt and hold for at least 10 seconds.
Gently pull to see if the crown-root segment is ready to be removed from its alveolus. After further elevation and luxation, if the root is still not becoming mobile, consider increasing the size of the bone window on the lateral surface of the root. Using a ½ round surgical length bur, remove more buccal bone to expose more of the apical portion of the buccal surface of the root and potentially create a notch approximately 2- to 3-mm deep on the mesial and distal surfaces of the root to provide space for a deeper placement of the elevator or luxator.
8) Once the mesiobuccal and distal roots have loosened up and are removed, the palatal root is removed. This root has the greatest likelihood of breakage during elevating. To increase the chances of removal of the palatal root without root fracture, remove 2 to 3 mm of bone lateral to the palatal root. Avoid making the window lateral to the palatal root as far dorsal as the windows on the lateral surface of the mesiobuccal and distal roots to prevent excessive bleeding.
9) Once the palatal root is removed, debride and lavage the alveoli and smooth down sharp edges of bone with a diamond bur (#23 round bur or football-shaped bur) until the bone feels smooth on palpation.
10) Obtain a postoperative dental radiograph of the area to ensure the extraction is complete. Even if you know the roots have been removed in their entirety, take a radiograph to document this.
11) Prepare for tension-free closure (Figure 3). The flap is under excessive tension if laying the flap over the defect results in retraction of the flap when letting go of it. Free the periosteum from the underside of the flap with either blunt or sharp dissection to release tension on the flap. Close the flap with 4-0 or 5-0 monofilament absorbable suture in a simple interrupted pattern.

Hopefully this guide will help you with your next firmly rooted maxillary fourth premolar. Principles of this example can be applied to any firmly rooted tooth.
John Lewis, VMD, DAVDC, Fellow, AVDC OMFS, practices at Veterinary Dentistry Specialists and teaches at Silo Academy Education Center, both in Chadds Ford, Pa.